Short introduction
The
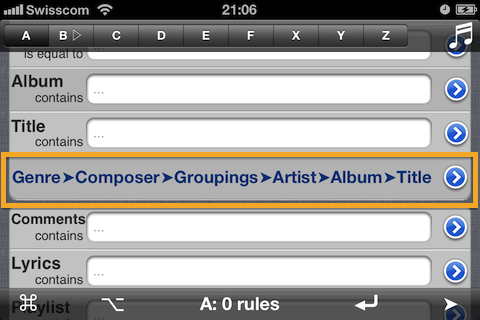
Music Browser lets you pick the desired genres, composers, etc. step by step, instead of typing the values into the search fields. In the standard configuration of SmartPlaylist you can first select one or more genres, then you get the list of all the composers in the selected genres, then the list of the groupings for the selected composers, then the artists, then the albums, until you get the list of all the titles in the selected albums.
It works similar to the Column Browser in iTunes. You can also select one, many or all on each level.
Getting ready
SmartPlaylist B is playing ("
B▷") and we don't want to interrupt it while we prepare and refine a new playlist in tab A. So we scroll to the bottom of the rules page (start view) and set "
✲ Show only" for A. This means that the results of the query for list A will be only displayed, but not loaded into the playback queue of the Music player, i.e. B keeps on playing in the background.
- Hint: You can see the current song now playing and skip to the next song in list B using the playback control with "♬".
In this "Show only" mode, the "Enter" and "Show" keys are shown as "
*⏎" / "
*➤" instead of "
⏎" / "➤".
Now we set up the Music Browser starting with a tap on "
⌘" (command menu) and selecting "Settings".
In the settings page we scroll to the bottom to select only some of the available browsing levels. As we only want to work with artists and their titles, we deactivate the other levels (composer, groupings, albums).
- Note: Genre cannot be deactivated, i.e. the Music Browser always starts with selecting the genre(s).
We navigate back to "Rules" (upper left). With our simple configuration the Music Browser is now "reduced" to Genre > Artist > Title.
Browsing the media library
1. Selecting the genres
Now we start the Music Browser with the blue/white "
>" on the right. SmartPlaylist must first read all the songs in your library in order to build up and cache the required data. This is only done once after launching SmartPlaylist.
- Note: Unfortunately, SmartPlaylist is not aware of changes in your music library (due to downloads or sync). To reload all the data you must use ⌘ > "Empty cache after sync" or re-launch SmartPlaylist.
- Note: After certain actions (e.g. changing the "Music Browser: Show / hide") SmartPlaylist reloads the data automatically.
First we get the list of all the genres. You can scroll around and pick the desired items with a tap. The number of selected items is indicated on top.
You can also search for specific items or see only the selected or un-selected items by using the search bar at the top of the list. Here we search for "Folk" by typing "fol":
- Hint: You can use "*" as a wildcard for any characters. "*folk" will only show entries which end with "folk" (e.g. "Ethno-Folk"). "rock*roll" will give you "Rock & Roll", "Rock'n'Roll", etc.. "*" will show all entries.
When you switch from "All" to "Not selected" and "Selected" SmartPlaylist automatically inserts just "*" to show all the selected or not-selected items.
So now we have picked three genres and navigate to all the artists in these genres with "Artists➤".
2. Picking artists
We can now select the artists. If we want all the artists, we do not select any or tap "All" at the bottom.
Again, we can search the list or filter only the selected or not-selected artists, as shown above.
If some artists are missing, then we can navigate back to "Genres" and add more.
Then we move on to "Titles➤".
3. Picking the songs
In the third step we now get the list of all songs by the selected artists. Again, we pick what we like. For now we want all the songs, so we don't select any (or use "All") and finish the selection with "OK
⏎".
4. Result: Search rules
The Music Browser
replaces all the rules above it (Genre, Composer, Grouping, Artist, Album, Title) with the selection made in the browser and confirmed with "OK
⏎".
- Note: The search type is changed to "is equal to" instead of "contains", in order to select only exactly what was picked in the browser.
All the other rules below it are not changed.
We have selected some genres and some artists, but not (yet) any particular songs. Therefore we get (only) two rules, one for genres and one for artists:
As you can see, the Music Browser only fills in the rules, which we could also type in directly (using " OR "). But picking many artists from a list is much more convenient than typing them in. In our example we have selected 14 artists, which makes quite a list:
5. Get the playlist
We could now adapt the rules or add more rules (rating, etc.).
As always, we launch the query with "
⏎", or rather "*
⏎" in our case and get the result list.
- Note: As list A is not in the queue for playback now, but only shown on the screen (remember: "Show only"), it is indicated as "*A" on top. You cannot play songs from this list by pressing on them in the list.
Once we are satisfied with the list (content, sorting), we switch back to the "
▷Load for playback" mode and tap "
⏎" to listen to this new smart playlist.